-->

Friday 31 August 2012

Doctor Who Awesomeness

To celebrate the new season of Doctor Who, I thought I'd shower this post with some of my favourite Doctor Who pictures I've found on the interwebs... 

Let's start with some Doctor Who/Disney cross overs - 
The 10th Doctor meets Monsters Inc.:


And the 11th Doctor meets Toy Story:


 This one actually made me laugh out loud...


And now for some random Doctor goodness:


And finally, my personal favourite:


*Sigh*
It will always be the dream. (Sorry, Husband). That being said I have the feeling Rob would run off with the Doctor should the opportunity arise, so I don't feel too guilty about it :P

Wednesday 29 August 2012

Fondant Motorbike Cake Topper

One of Rob's work colleagues recently celebrated his 40th birthday, and I was asked to make a fondant motorbike to go on top of his birthday cake.

FYI, Rob's work didn't just have cake to celebrate. Everyone had fish and chips for lunch, more party food than they could handle, and a Wii and Kinect were set up in the back office. I arrived just in time to fail miserably at Kinect tennis. These damn kids with their hula-hoops and Pac-Man video games...

Anyhoo, I asked Rob what kind of motorbike his colleague had - a 2012 Bonneville Triumph, apparently. Which means nothing to me (I just know it looks black and pretty and shiny) but I'm sure bike enthusiasts will be able to relate - and we googled some pictures and found this:  


So we blew up the picture as big as we could and turned Rob's mighty computer screen to face me, where I sat on the couch and attempted to re-create the bike in fondant by copying the image from the computer.

Here's the finished result:


I tried to make it as close to the model as I could - while keeping it all in one piece! It's not exactly as, erm, sleek as the real thing, but I've been assured it looks like a bike. Which is important when you're making a bike cake topper. I say 'assured' because, much like when you say a word over and over and it begins to lose all meaning and you start to wonder if it's even a real word, the longer I worked on this bike the more sure I was that it looked like a nondescript blob. But the birthday boy was well chuffed so I was very flattered :)

I also added a few little details, like indents for 'padding' on the seat cover, and red and orange food colouring for the back lights:


The motorbike cake topper was also the début of my first ever edible food pen - which turned out to be a very lacklustre experience, indeed. (For those unfamiliar, edible food pens are like textas/sharpies you can use on fondant). Well, I managed a few details with my pen, but nothing like I had envisioned. It seemed to be constantly running out of 'ink', and wasn't nearly as miraculous a baking companion as I had imagined.

Sigh... You live and you learn. I may just have to save the pen for fiddly eyes and such - I'm sure it could handle that :)

Monday 27 August 2012

Doctor Who Desk Companions

It's the end of August. And that can only mean one thing:

New Doctor Who.

I'm sure it probably means many other things, but that's what it means to me.

Now it just so happens that both my husband and I are HUGE Doctor Who fans.

And by Doctor Who fans I of course mean 'obsessed geeks', just like every  Doctor Who fan is. There really is no middle ground. You either hate it, or love it to the point of mania. And we are happily nestled in the latter.

Anyway, it was recently my husband's birthday, and for my gift I thought I'd revamp his computer desk with a little Doctor Who awesomeness.

So, I changed his desk from this:


To this:


I made the stand-up characters by drawing a cartoon adipose, ood, cyberman and 11th doctor on thick paper, then cut them out with 'tails' attached. I scored along the bottom of the characters and folded the tail over to make a stand, then blu-tacked them to the monitor. 


I made the TARDIS pencil holder out of an old milk cartoon. I just cut it to size then covered with plain paper, drew on the TARDIS front on one side and painted the rest blue. 


I painted the Doctor Who logo onto an old black mouse-pad with acrylic paint, and the paperwork holder (not Doctor Who themed, admittedly) was made with an old, and I must emphasise clean, pizza box. 


I also have to add that I had this totally elaborate birthday surprise planned. I was going to put all my Doctor Who goodness in a box and lead Rob on a scavenger hunt to find them... But he surprised me by coming home early the day I was making everything, and walked in on me attacking a pizza box with masking tape and wrapping paper. 

I heard the lock go and froze, scissors in hand. Rob entered smiling and I yelled, 'WHAT ARE YOU DOING HOME? I'M MAKING PRESENTS, GET OUT!' and he promptly exited backwards into the hallway. But of course, it was too late. My TARDIS pencil holder lay drying on his computer chair, my character sketches were scattered about the room and the floor was littered with paper debri. There could be no sufficient hiding of his presents at this point. The irony was that Rob purposely didn't tell me he got the afternoon off to give me a 'nice surprise.' It was more a 'panic attack' than anything else, but I appreciate the gesture :)

Saturday 25 August 2012

Serenity Now!

As a crazy huge fan of Firefly and a massive cake enthusiast, I squeed a little when I found this online:


Serenity cake!!!

It was obviously created by some mad cake genius, and I am in awe of its absolute perfect perfectness.

And now I think I need to go and watch ALL the Firefly episodes and Serenity in order to quench my Space Cowboy thirst. 

Thursday 23 August 2012

Paper Craft: Magnetic Picture Frames

Living on, let's say 'humble' monetary resources, means when it comes to gifts I have to be a little bit creative...

So the other day I made this:


Paper cupcake magnetic picture frame... Thing!

So if you're after a new paper craft idea that you can use for gift giving, these are fun, easy to make, and look adorable. 

Here's what you do...

Start with a page of thick paper, and cut it so that it's 9cm wide and 20cm long:


Mark with a pencil to make 9x9cm squares and a 2cm tail:


Use a scalpel to score along the lines and gently fold:


Draw a cherry on the bottom of your 'top' square (the one without the tail) and cut out with a scalpel:
(Sorry, forgot to take photos at this juncture. My bad).

Fold at the creases to bring the squares together, tuck the tail underneath and glue together:


Leave to dry, then draw the outline for your cupcake:
(Again no photos. I suck).


Trace around something circular and cut out to turn your cupcake picture into a cupcake picture frame:
(I swear to God I will one day learn to use a camera for every step of a craft project).


Colour your cupcake in, glue a magnet to the back, and you're done!


NOTE: I used colouring pencils and black pens to colour my cupcake, and violated a fridge magnet in order to provide my picture frame with a magnetic strip. You don't need a strong magnet, so if you have a regular rectangular fridge magnet (like the ones you always get free in the post from real estate agents and the like), a small strip from one of those will more than suffice.

And that's how easy it is to make a cupcake magnetic picture frame! So why not make a whole bunch and give your fridge a bit of colour? :)

Or photoshop them for the purposes of blogging :P


Tuesday 21 August 2012

Bug Cookies!

I seem to recall (vaguely) that after I made my Futurama Meme Cookies I said my next adventure in cookie flooding would be in making South Park themed cookies...

I made these instead:


Bug cookies!

I made them with the lucky last of the left-overs from my Pac-Man Cookie dough, and I am so in love with how cute they are!


And they were pretty simple, really: just circular cookie cutters (overlapped for the caterpillar) and mooshing the dough into vague diamond shapes for the leaves.

I used icing sugar, water and food colouring for the flooding, and while it's not as effective as royal icing I think they still turned out really well.


And I also think I should definitely make more cookies...

Monday 20 August 2012

Oh Doctor Who...

How I love you :)

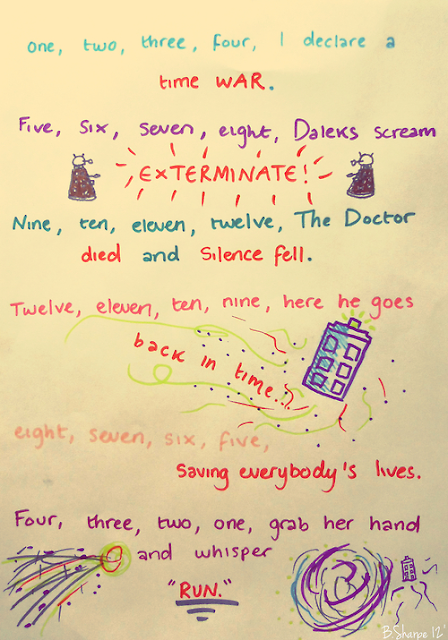
I'm counting down the days til the new season of Doctor Who starts (omg, omg, omg, omg) but in the meantime this totally adorable and completely awesome Doctor Who rhyme is helping to keep me sane:


Less than a week now til new Doctor Who!

Soon, Doctor... Soon.

Sunday 19 August 2012

The Dark Knight Rises

And seriously impresses.

Today I finally went to see The Dark Knight Rises at the movies, and it was so worth the wait.

Ok, it was long...

Ok, there were a few pretty obvious plot holes...

And ok, if I'm totally honest, I can't take Christian Bale's Batman voice seriously after watching 'The Coon' episodes of South Park... 


But it was AMAZING. 

And I can forgo any less-than-super-perfect moments simply for the fact that it's a super hero movie, and certain allowances must be made.

I think, in order to celebrate this awesome film as only I can, I need to make some Batman themed goodies. Problem is I'm going to be kind of swamped with other projects this week, so they might have to wait awhile. But I'm hoping, just like my wait to see The Dark Knight Rises, that they'll be totally worth it :)

Saturday 18 August 2012

Tom's Birthday!

Last weekend my best friend Belle and her other half Paul celebrated their little boy Thomas’s first birthday :)

Since Belle resides in Perth and I in Melbourne, I sadly couldn’t make it to the festivities :( though I was definitely there in spirit... And on Skype for the cake cutting :P

Speaking of cake...


Belle so loved the Cheeky Monkey party theme that she decided to use it as inspiration for Tom’s first birthday party! (Flattered, much?) And WOW, did she do an AMAZING job.


The house was fully decked out like a jungle – green streamers hanging down and animal balloons, plus Belle managed to find some super cute bits and pieces to keep with the theme – like these totally adorable jungle themed patty pans and candles:


She even printed off the cheeky monkey themed invites to send out!


AND she made an incredible cheeky monkey cake and matching cupcakes!

Super impressed.
And the outlining, unlike mine, was done using M&M’s, and
 the monkey 'fur'? Crushed Tim Tims. Drool... (way to take my idea and make it better, Belle. Sheesh). 

She was even gracious and good humoured enough to send me some ‘in-progress’ pics – which were hilarious and awesome.

See, the cake didn’t bake flat...
And my suggestion to just flip it and ice the bottom was dismissed when Belle sent me this:


Hmmm....

So she got herself a knife and she made that bad boy flat.

And then, as any normal, dessert loving woman would, she ate the excess :P


 Come to think of it I may have suggested that bit, too... 

The party was a huge success and everything looked AMAZING – a perfect first birthday party for a very special one-year-old boy.


Happy birthday, little man xxx

Friday 17 August 2012

It's pictures like this...

That make my life:


Bwahahahaha! Get it? Cos Star Wars. And Office Space.

You're all laughing so hard right now.

And I love so much that this guy, Gary Cole:


who plays this guy, Lumbergh:


is also this guy:


Harvey. Freaking. Birdman.

And it's also facts like that that make my life :)

UPDATED
I just realised that this is my 100th post - and as if the interwebs knew to celebrate, the blog had 100 views yesterday! Thanks, all :)

Tuesday 14 August 2012

Mini Berry Meringue Pies

In yesterday's post, I mentioned that the Lemon Meringue Pie recipe I use makes more pastry than you need. So here's what I did with the excess:


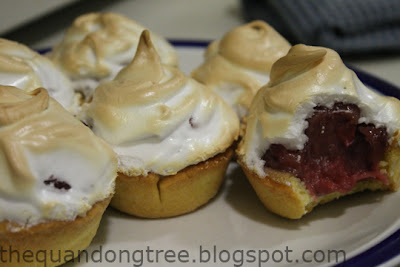
Mini Berry Meringue Pies!!!

Since I already had the pastry, all I had to do was pervert the original Lemon Meringue Pie recipe. This was surprisingly easy.

So, here's how to make Mini Berry Meringue Pies...

Mini Berry Meringue Pie Recipe
What you need...
Pastry (link in yesterday's post)
3 Tbsp corn flour
1/3 cup caster sugar
1/3 cup orange juice
1/2 cup frozen mixed berries
1/4 cup water
40g butter
1 egg (separated)
Caster sugar, extra

What you do...
Pre-heat the oven to 180ᵒc, grab a stick of refrigerated butter and go to town on a 6 pan muffin tray. Roll the pastry out thin, cut into circles, and gently press into the now greased up tray. Place small oven weights on each pastry - or, in lieu of oven weights, do what I did: fold a few teaspoons of rice into al-foil and plonk them on top of each pastry. Bake for around 10 minutes, take out of the oven and discard rice parcels (or oven weights if you're normal).

Combine the corn flour, sugar, juice, berries and water in a saucepan and stir constantly over a moderate heat until, like with lemon meringue filling, the mixture turns transparent and thick. Leave to cool slightly (I transferred my mixture into a cool container because I'm impatient), then mix in the butter and egg yolk. Spoon into prepared pastries.

Whisk up the egg yolk with a few teaspoons of sugar (make sure you add the sugar slowly and only after the egg white has started to thicken). Once stiff (and sweet enough for your tastes) spoon on top of filling and spread to the sides. Bake for around 10 minutes or until the meringue and pastry has browned slightly.  

And there you have it.


Unlike Lemon Meringue Pie, these Mini Berry Meringue Pies are quite sweet - but just like Lemon Meringue Pie they are incredibly morish :)

Monday 13 August 2012

Adventures in Lemon Meringue Pie

My husband brought home some lemons the other day from one of his colleague's tree's. (I should point out the lemons were given to him, he didn't scale their fence and nick them or anything).
And my reaction was naturally: Lemon Meringue Pie. 


I LOVE Lemon Meringue Pie.

It's all kinds of goodness, and I haven't made one in years, so Lemon Meringue Pie making has been well overdue for awhile. I actually made 5 in a day a few Christmases ago - one for each Christmas party.
Time consuming. And totally worth it.

Anyway, the recipe I use can be found here from exclusivelyfood.com.au.

A few things when adventuring in Lemon Meringue Pie making:
1) I find the recipe makes an excess of pastry, almost enough for 2 pies (just FYI).
2) Meringue can be a cruel temptress: make sure your mixing bowl is clean and cool, avoid plastic bowls, and make sure no remnants of egg yolk sneak through.
3) Make sure your filling has cooled a bit before adding the butter and eggs - you don't want your egg yolk to cook! I transfer my filling from the hot saucepan to a cool container to speed up this process.
4) Since meringue can be so temperamental, to avoid wastage break each egg into a different cup, so if yolk sneaks through you're only down 1 egg instead of 3.

Here's the end result from our adventure in Lemon Meringue Pie making:


And now here's the rest of the story...

It really must have been awhile since my last adventure in Lemon Meringue, because when my first meringue (that's right, first) failed to stiffen or really do anything more than make a silky sludge, I continued to harbour the misguided hope that it would thicken 'any moment now'.

For over half an hour.

Over half an hour of my husband and I (mainly my husband) whisking the egg whites and sugar by hand. Eventually we had to admit defeat and I googled the crap out of meringues and how to make the peaks 'peak' - or in my case, make peaks at all. That's when we discovered that a cool glass bowl should, for whatever reason, be infinitely more effective than a plastic one (like we were using). And oh yes, it was. I broke and separated 3 new eggs (in individual cups, of course) and whisked them for all of a minute in the glass bowl before they starting changing from transparent goo to white froth. Within 10 minutes the meringue was done - the pie was saved! - but what to do with our failed first attempt??

My husband had the solution: he was going to fry it up and eat it.

Now I'd like to point out here that I told him, in no uncertain terms, that this was a bad idea. Bad enough to fry up 3/4 cup of caster sugar and 3 egg whites - worse still when your husband insists on adding the 3 left-over egg yolks and a cup of soy milk.

But he insisted it would be tasty.

But even Rob in his delusional state thought of exactly the same thing I did when he started cooking. And that was this meme:


So much so that he donned his own pair of goggles to wear while he cooked:


(Note the beautiful looking Lemon Meringue Pie in the background. And ignore everything else).

His weird concoction of failed meringue, egg yolk and milk frothed and nearly exploded over the sides of the fry pan, only to shrink into a yellow, blobby mess, which he then ate with jam on bread...


And when the jam and bread ran out, he finished the rest off with tomato sauce.

And it wasn't until he'd eaten every last bit of this sugar drenched omelette monstrosity and banged his plate down that he said, 'Well. That was disgusting.'

Some days I really just don't get how my husband's mind works.
Related Posts Plugin for WordPress, Blogger...