-->

Saturday 30 June 2012

Bat-Gir: Invader Zim meets Batman

Like most misfits my age, I have a slight obsession with Invader Zim. 

And, like everyone that has a slight obsession with Invader Zim, I am head-over-heels in love with Gir.

(For those that don't know Invader Zim or the sheer awesomeness of Gir, the malfunctioning, taco eating robot minion of Zim, the Irken Army's worst Invader, then I suggest you check out this link).

Anyway, my love for Gir - and my love for superheroes - led me to create this:


BAT-GIR! 

Look at him, being all serious! D'awww.

Bat-Gir is now available to buy in both my Redbubble and Etsy shops (just click on the cupcake links!)


Friday 29 June 2012

Animal Artwork

I've been working hard adding more work to my portfolio this past week. This basically consists of me sitting at my computer with my graphics tablet placed precariously on my lap and drawing on Photoshop while a small window in the top right hand corner of my screen plays The Simpsons (only up to season 9 - it kind of went to hell after that, as any child born in the 80's will attest).

Here's a sample of what I've come up with...


I got inspired after making those Zoo Animal Cupcakes :P

My little elephant with his balloon is now available as a t-shirt design on my Redbubble portfolio, and I used my cheeky monkey to make a birthday invite template for my Etsy shop.

Whoo-hoo! Being productive!


Thursday 28 June 2012

Doctor Who Cupcakes!!!

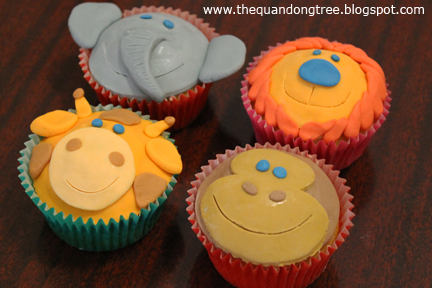
After my big rant yesterday, I was pleasantly surprised with how my Doctor Who cupcakes turned out - and with how easy they were to do!


LOOK AT HOW CUTE THEY ARE!

These are the first cupcakes I've made for the blog that I've been this happy with.

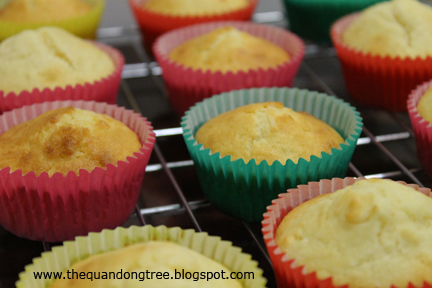
To make them I used my coconut cupcake recipe with basic buttercream before decorating with Orchard's White Icing (and making a mess of my hands and kitchen mixing colours. Worth it). 

So how exactly to you make the 'Doctor Who' part of Doctor Who cupcakes? Well, let's take a look at my little dudes one by one...
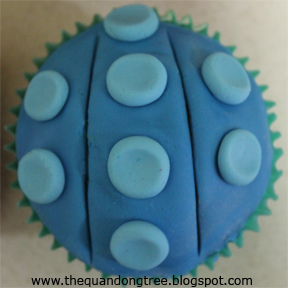
1. The Dalek:


Or to be more accurate, a portion of a Dalek body. Would you call it a 'body' though? Doctor Who fans will know what I mean - 
I hope :)

Colour your fondant (keep extra icing sugar handy as adding food colouring to fondant/white icing can be a sticky business). Dust your work surface with icing sugar (and your coloured fondant too for good measure) and roll out thin. Cut out with whatever circular cutter fits the size of the cupcake. 
I used a drinking chocolate lid :P

Press onto the cupcake and roll out small balls of lighter coloured fondant. Space them evenly on the cupcake and press down. Use a bit (a teeny tiny bit!) of water if they need help sticking. Use a sharp knife to cut lines for sections.

I really hope all this is making sense. Anyway, moving on...

2. The Doctor:


Or more specifically, the 11th Doctor.
You can totally tell from the hair and bow tie :P

As before: colour fondant, roll out thin, cut and press onto cupcake. Since I have no black fondant or piping bag (grumble, grumble) I made very cutesy blue eyes by rolling out teeny blue balls of fondant (I had plenty of practice after yesterday...) and adding even teenier white balls on top for light. 
You know, as you do.

To make The Doctor's nose, roll a small ball out of the same skin colour and press down - flattening one side only. Roll out a small snake of pinkish fondant and curve into a smile for his mouth. 
3 balls of red fondant strategically placed make up his bow tie.

As always, use a little water to stick bits down if need be. 

As for The Doctor's iconic hair, roll out 2 fat brown snakes - one short, one long. Make them thinner at one end and press the fat ends together to make his side part. 

And you have yourself an 11th Doctor cupcake! Whoo!
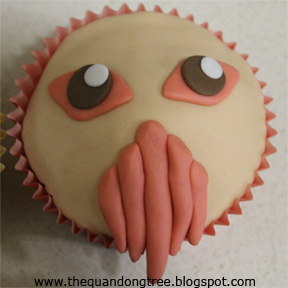
3. The Ood:


 I am super pleased with how cute this little guy turned out :)

You can really use the same colour fondant for both the Doctor and the Ood's skin, but I added a little extra yellow to the Ood. Because I could. As ever: colour, roll, cut and press. Roll out pinkish fondant into small thin snakes to make the mouth: attach the longest one in the centre of the cupcake and go out either side from there in a triangle. 

If all this doesn't make sense, just look at the picture. It's pretty self explanatory :P

Use the same pinkish fondant for the Ood's eyes. I made these by making diamond shapes and flattening them out. Rather than leaving the Ood looking possessed by demons, finish off with small brown circles and even smaller white circles on top.

Easy peasy! 
Is that how you spell 'peasy'?

Anyway, lucky last (and my personal favourite)...

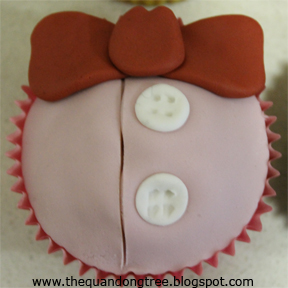
 4. The 11th Doctor's shirt:


Look! Buttons!

Once again: colour, roll, cut and press. Slice the fondant slightly off the the left with a knife to make a line down the shirt. Roll out 2 small white balls and press down for the buttons. Use a fork to mark the 'button holes'. 

To make the bow tie flatten out 2 equal sized maroon coloured balls into what I like to call 'vague triangles'. Another equally accurate and bizarre term would be 'lazy love-hearts'. Place them side by side up the top of the cupcake. Finish off with a slightly flattened ball of maroon fondant that's been pinched up the top.

And if you've managed to work through and decipher this guide, you've now got yourself 4 super cute Doctor Who cupcakes!


Awwwww.


Is it weird that I find the Ood cupcake so adorable? Cos I do. 
Just sayin.


Wednesday 27 June 2012

Zoo Animal Cupcakes!!!

ZOO. ANIMAL. CUPCAKES.

Are there sweeter words in the English language? Probably, yes. But none the less - zoo animal cupcakes, people!!!


Now, despite my excitement, I'm actually labelling these cutesy cupcakes as a bit of a fail.

Let me explain...

Fondant is expensive. As such, I buy Orchard's White Icing from the shops (super cheap and so easy to use - seriously, check out their website, you can download a free recipe book!) and colour the icing myself by hand.

Usually not too much of a drama - unless you need black fondant. In which case I have to painstakingly paint black food colouring onto the icing, being ever-so-careful not to let it touch anywhere it shouldn't because it will run.

So that's issue 1.

Issue 2 - I don't own a piping bag. As such, instead of piping on eyes and mouth detail, I had to roll teeny tiny little balls and very carefully apply them to the cupcakes for eyes, and use my scalpel to cut into the icing to make mouths.


Yeah.

I felt freaking evil doing that, too. It's like perverted cupcake surgery. 

Issue 3 - I live in what could be called a 'small' student flat. A more accurate description would be 'a hotel room'. It's literally one room with kitchenette and bathroom attached. Now my kitchen could be called 'modest'. A more accurate description would be 'ridiculously tiny'. As such, making detailed cupcake designs can be... frustrating... in such a confined space.

Now, don't get me wrong. I love making and prettying up cupcakes - and anything sweet for that matter. I'm just trying to paint the picture as to why my zoo animal cupcakes did not turn out exactly as I'd hoped...


I also attempted to make a tiger cupcake, but having to paint on individual stripes with a tiny paintbrush and with liquid colouring as opposed to the powdered colouring you're supposed to use gave me an angry tick. As well as a bad back.

Now, if you happen to have different coloured fondants, the right kind of food colouring, a piping bag and space, you could make some truly exceptional zoo animal cupcake creations.

But how many of us actually have those things? 

While I do intend to slowly build up my collection of baking supplies (so I will have all those things), most people will stick to the basics. 

As such, I'm going to try my hand at an animal cake later in the week - something anyone could make with the kind of stuff we all have access to. Wish me luck!

In the meantime, if you have space, time and a piping bag (so you don't have to slice into their cute animal faces), then these little guys might just be for you.


As for me, I'm off to make Doctor Who cupcakes...

As simply as I can :P

Tuesday 26 June 2012

Coconut Cupcakes!!!


Here's a recipe for coconut cupcakes that's simple and quick to make (2 of my absolute favourite adjectives when it comes to baking cupcakes... Or really anything. Ever).

So, here's the recipe:

And here's what you do...

Soften the butter in the microwave and stir in sugar until creamy and delicious. (Seriously, how good is butter and sugar mixed together??! Drool...) Add the eggs and vanilla essence. Fold in the coconut and flour alternatively with milk, then spoon mixture into patty pans and bake for around 15 minutes at 180c. 

Boom! Done!

Easy, no?

This recipe makes around 18 cupcakes.

The coconut flavour is quite mild, so if you're after something stronger opt for dessicated coconut over shredded - or chuck some coconut into the icing. Actually, that's not a bad idea...

I'm quite excited because I'm using the coconut cupcakes I made as the recipe for my zoo animal and Doctor Who cupcake designs (which I'll be posting very soon!)


These coconut cupcakes are so good you can just eat them straight out of the oven. Now, I'm usually pretty pedantic with my cupcakes and demand a nice, unhealthy dollop of buttercream icing on top before I go crazy on them, but these are just as good plain. 

Not that I'm saying you shouldn't go to town with icing if that's your thing... 


Monday 25 June 2012

Octagonal Paper Box

A couple of weeks ago I received a care package from my Mum in Perth...


A card with kitties on it, an origami box, and a knitted hat! 
(The latter 2 both being hand-made by Mum herself).

The picture doesn't really do the hat any justice, does it? It's kind of like a big beanie with tassels - super cute and super warm. Perfect for the kind of weather we're having right now!

Anyway, Mum has been getting into paper craft lately and had just learnt how to make octagonal paper boxes:


And loved them so much she had to send me one!

And I gotta say...


They're pretty freaking cool.


If you'd like to make your own paper box, instructions can be found on usefulorigami.com
For origami and paper craft fans, this site is a goldmine. 

I'm going to try my hand at making an octagonal box today and to be honest, I'll be happy if it looks half as awesome as the one Mum sent me :)


Sunday 24 June 2012

Random Photo Day!

I found this picture on the interwebs and I just had to share:

  
IS IT NOT THE CUTEST THING YOU'VE EVER SEEN??

I mean, Star Wars meets Winnie the Pooh - genius!

In other news, I showed my husband my post yesterday RE Back to the Future and the lack of hoverboards and he says, 'you realise hoverboards do exist and have existed for years? I have to look this up now to prove you wrong!' Then he runs the 2 feet to his computer and promptly starts searching hoverboards.

This is what he found.

Now I'll admit this is AMAZING, but 2 things spring to mind:

1) It's called an Airboard. I want a damn hoverboard, and

2) It bears no likeness to the sleek, pink, skateboardesque design from Back to the Future. And I want a damn Back to the Future styled hoverboard.

Still though, awesome.

I got my own back on his being so pedantic when we later watched Stargate and I questioned the plot holes throughout the entire movie.

Not a bad Saturday.

Saturday 23 June 2012

Back to the Future

I recently re-watched all 3 Back to the Future films. 

Is it just me or did the 80's really create some of the most iconic movies of all time?

From geektyrant.com - they have heaps of awesome behind the scenes shots!

I always had a bit of a soft spot for Back to the Future because it was set in 1985, the year I was born. In fact, I was 24 days old on the date the films are set. I have no idea why, but this fact makes me weirdly proud. 

Anyway, while watching the 2nd film it suddenly dawned on me...


WE HAVE 3 YEARS FOR SOMEONE TO INVENT HOVERBOARDS.

As any die-hard BTTF fan knows, the 2nd film is set in 2015. And while it sports many advances in technology, like flying cars and thumb print recognition, it's the hoverboards we're all waiting for.

So where are they?

Someone has to get on this - and I mean NOW.

And ok, technically they 'exist' and you can apparently pre-order your own hoverboard for $120. But before you don a fluro cap, oversized jacket and Nike sneakers, you should know - it doesn't actually hover. That's right, Mattel are releasing replica hoverboards. That don't hover.

Now that's all well and good and actually pretty damn awesome - I would totally pay $120 for a replica BTTF hoverboard. If I had $120. But what I'm saying is: WHERE ARE THE REAL HOVERBOARDS? It's 2012! I can accept that we're way off flying cars and thumb print recognition, but seriously, how has no one created a hoverboard yet?

We have 3 years, people. Let's do this thing.


Friday 22 June 2012

How to make fondant roses...

Yesterday I made super tasty chocolate cake with chocolate ganache - AND fondant red roses.


See?

Now, this was my first time making fondant roses and, well, I'm indifferent to them. Not indifferent to fondant roses, but indifferent to my fondant roses. I think they're... all right. But with time and practice I hope to become a fondant rose expert. Because that's totally a thing. The interwebs will award me a plaque in fondant rose making and I'll hang it proudly on my wall.

I shouldn't have had chocolate cake for breakfast. 


Anyway, I guess what I'm trying to say is that these fondant roses are a great place to start for beginners - like me :) They're simple to make but very effective.

Here's how to make them...


These simple fondant roses make for a perdy cake accessory, and if you're after a sugar fix they'll definitely do the trick :)


Thursday 21 June 2012

Super Tasty Chocolate Cake!

Here's an easy recipe for super tasty chocolate cake with chocolate ganache. Seriously, this recipe is drool worthy, and almost heart stoppingly good due to the ridiculously huge amount of chocolate involved.

So you might want to pace yourself eating. You know, like half the cake today and the other half tomorrow :P

Ok, jokes aside, don't do that. You'll injure yourself.


Not bad, huh?

My initial plan was to make rose cupcakes yesterday...  but I ended up making this chocolate cake instead. So sue me. 


One word - YUM.

And you know what else? It's easy to make, too...


See? The best part for me is that ganache is so simple and quick to make, requires basically no skill or effort, and makes any cake look super fancy - and taste AMAZING.

But onto the important stuff.

As readers of my blog will know, I tend to preach a lot about the dangers of unsustainable palm oil. If you're unfamiliar with the issue, check out Zoos Victoria's Don't Palm Us Off campaign.

As if worrying about palm oil wasn't enough, there happens to be a major issue with any chocolate recipe, and that issue is: where did the cocoa come from?

I mentioned in my recipe to make sure you use 'happy cocoa', what I mean by that is make sure whatever brand you buy doesn't obtain its cocoa via child slave labour in the Ivory Coast. Because believe it or not almost half of the world's cocoa supply is farmed by child slaves.

Unbelievable, huh? :(

I always use Cadbury chocolate and cocoa because I know it's a brand that's safe to use. To find out more about the brands you buy check out their websites or email them. You can find out more here about both the slavery issue and what different chocolate companies are doing about it.

Because here's the thing. Chocolate is amazing. I love it almost as much as my husband (some days more, if I'm honest) but I couldn't enjoy a chocolate cake like the one I made yesterday knowing I could be contributing to the ongoing slave labour of children. While it's an absolute travesty that companies are allowed to obtain cocoa (and goodness know how many other things) unethically and at the expense of the lives and well-being of less fortunate people, we as consumers can take a stand by avoiding brands that think it's ok to exploit children. 

So make sure you're an informed consumer! Then you can have your cake and eat it, too.


Back to the deliciousness in the picture above, you may notice that this particular chocolate cake sports small red fondant roses - I'll be posting how to make those tomorrow :)


Wednesday 20 June 2012

Re-vamping Artwork

The past week or so I've been on a bit of a bender re-vamping and 
re-working older artworks of mine. Cos that's the kind of bender I go on. That and chocolate ones. 

Basically, over the past year or so I've been working more and more on my graphics tablet, and finding it easier and easier to navigate my way through Photoshop CS3. You should have seen me when I first got Photoshop. I hated it. And complained loudly about how user-unfriendly it was to my husband on a daily basis. I like to think I've evolved slightly since those first dark days. Oh, complaints are still made, just on a less regular basis.

Anyway, I'm trying to update and add work to both my Redbubble gallery and my Etsy shop, so here's what I've managed so far:

Kind of terrifying, no?

This was my first attempt at my 'Homeless Orang-utan' t-shirt design on Redbubble. I did this before I had a graphics tablet. I drew the orang-utan by hand, scanned the image onto the computer, then coloured it in on Photoshop - using a mouse. I also had to go over the black outlines I'd drawn because quality was lost in the scanning. Doing that with a mouse is painstaking work. Believe me.


Unhappy with my original attempt, I ended up with this guy. Same deal - outlined by hand, scanned, coloured and re-outlined in Photoshop with the mouse. And I was happy with him. In fact, this has been the 'Homeless Orang-utan' t-shirt design on Redbubble for the past 2 years.

But then I got a graphics tablet, and a couple of days a go, this guy was created:


LOOK AT THE DETAIL!!! Or at least the fact that there's actually any detail at all!!! 

So this little guy is now the new face of my 'Homeless Orang-utan' 
t-shirt design.

Why use the concept of a homeless orang-utan as a t-shirt design at all, I hear you cry? To help raise awareness about the devastating effects unsustainable palm oil plantations are having on this incredible species.

Oh, and it gets better - us Australians are to blame. Without knowing. Unsustainable palm oil is the cheapest oil for us to buy, so many Aussie and international companies use it in their products, and it's in everything from soap and face cream to basically every packaged food known to humankind. But we don't know if we're buying it because last year the House of Economics Committee rejected the Truth in Labelling Palm Oil Bill. As such, palm oil does not need to be labelled ON ANYTHING, and is usually simply listed as 'vegetable oil' in food or crazy scientific names like 'glyceryl stearate' in cosmetics - so we as consumers have no idea what we're really buying or if our choices are aiding the extinction of an already critically endangered species.

Beyond comprehension, isn't it? :(

But there's hope for informed consumers yet - check out Zoos Victoria's Don't Palm Us Off campaign and download their Palm Oil Ingredient Card. It lists all the various other names for palm oil that are used so you know what to avoid :)

Of course, sometimes vegetable oil contains no palm oil at all - depending on the credibility and awesomeness of the company, so a really good site to check out is The Ethical Consumer Guide, where you can find out how goodly or how crappy your favourite brands are.

Anyway, back to the original point of this post, I also re-vamped my witch drawing. Here's the original I created when I first got my graphics tablet:


And the re-vamped version I finished up the other week:


Simply put - cats make everything better.

There are a few more bits and pieces I've been working on, but I think I'd better end it here. I think this is the longest post I've done... :P

Today I'm attempting to make rose cupcakes, so all going well I should have some very pretty pictures to post tomorrow :)


Tuesday 19 June 2012

Vegan Treats: Muesli Biscuits


When scouring the interwebs for quick and easy vegan treats, I discovered that there weren't really any. Apart from Chocolate Crackles (which I didn't actually find in a 'vegan' related search, anyway!) most recipes involved vegan substitutes for eggs and dairy products - which are often either hard to find in generic supermarkets or quite pricey.
Or both.

Considering my very limited budget for baking, I had to find something that I could make with things I had at home that didn't require the aid of pricey vegan substitutes.

The answer: Muesli Biscuits.

I came across a recipe for Muesli Slice (again, this was found in a non-vegan related search), and I used that as the basis for my vegan friendly muesli biscuits.


These muesli biscuits are crunchy on the outside and chewy on the inside - and for biscuits, they're not even that bad for you. Well... They're better than most other biscuits, anyway :P

So, here's how to make 'em:


And that's how you make muesli biscuits :)

This recipe makes around 24. Or one giant muesli biscuit depending on how you want to do it :P


Sunday 17 June 2012

Random Photo Day - The Awesome Husband Addition

Today I'm sharing a couple of photos to show how lovely my husband is. 

This past week I've been sick with yet another cold (thank you very much, Melbourne weather!) and Friday night my husband came home with these to help make me feel better:


N'awww.

Roses and a block of Cadbury chocolate - I started feeling better almost immediately :)


So pretty!

The roses are still looking lovely in their vase - the chocolate lasted less than a day :P


Saturday 16 June 2012

Vegan Treats: Chocolate Crackles


Yum yum, chocolate crackles!

God, making these made me feel like I was 6 again. Not that I made chocolate crackles when I was 6, but I ate a lot of them.

I did try to make a cake when I was 6. Mum was out and I managed to convince my dad I knew how to bake a cake on my own.

And in my defence, my time spent in the kitchen with mum meant I knew what ingredients to use - I just had no concept of how much of anything to put in. So I made an educated guess. Which at 6 meant drowning the recipe in sugar. Oh, and I also decided to make it green. The result was a slooshy, flat, lopsided zombie looking concoction. And totally inedible. Who knew baking cakes involved more than throwing ingredients in together and hoping for the best?

Wait, that's how I bake now. I guess my skills haven't really evolved.

Anyway, back to chocolate crackles...


I decided to try my hand at vegan sweets because I wanted to make something for my husband to take to work to share (how very 1950's, I know), and one of my husband's colleagues is vegan.

I scoured the interwebs for vegan recipes ideas, when it suddenly dawned on me that one of the easiest and quickest recipes in the world was inherently vegan - chocolate crackles!


I used the recipe found here on the Cadbury website, but made one change: I substituted rice bubbles (which can contain traces of milk) for Abundant Earth Puffed Rice, the healthy (and vegan friendly) alternative to traditional rice bubbles, which contains 100% whole brown rice grains. Sounds kind boring, I know, but Oh My God, if you haven't tried them you seriously have to. Like right now. Go out and buy some right now. They make for a surprisingly tasty breakfast. 

Also, interesting side note, turns out copha (the stuff that sticks chocolate crackles together), though horrendously unhealthy, is completely free of palm oil! So chocolate crackles are good for vegans, South-east Asian rainforests and orang-utans! Bonus!


What also makes chocolate crackles a winner for me is the pure simplicity of them. I love myself a quick, easy recipe where you just bung everything together.

I guess I haven't changed that much since I was 6.


Related Posts Plugin for WordPress, Blogger...